Setting up R and RStudio
Kellogg School of Management
Professors Brett Gordon and Robert McDonald
December 14, 2018
This document will help you complete the following steps:
- Install R.
- Install RStudio.
- Install LaTeX.
- Create a new RStudio Project.
- Compile the R tutorial contained in dominicks.Rmd to test your installation.
If you need help, you may contact KIS at 847-467-2100 (Global Hub) or 312-503-0159 (Weiboldt) or by email at kis@kellogg.northwestern.edu. They have tested these instructions and should be able to help. Please include a screenshot of any errors you encounter.
1 Install R
Download and run the installer for your operating system. If the installer asks questions, accept the defaults unless you have a reason for doing otherwise.
- Windows: https://cran.r-project.org/bin/windows/base/. At the top of the page, click on the link to the executable file under “Download R 3.5.1 for Windows” or similar. The version number may be different when you read this.

- Mac OS X: https://cran.r-project.org/bin/macosx/. Under “Latest release”, look for the link on the left to download the package “R-3.5.1.pkg” or similar. The version number may be different when you read this.
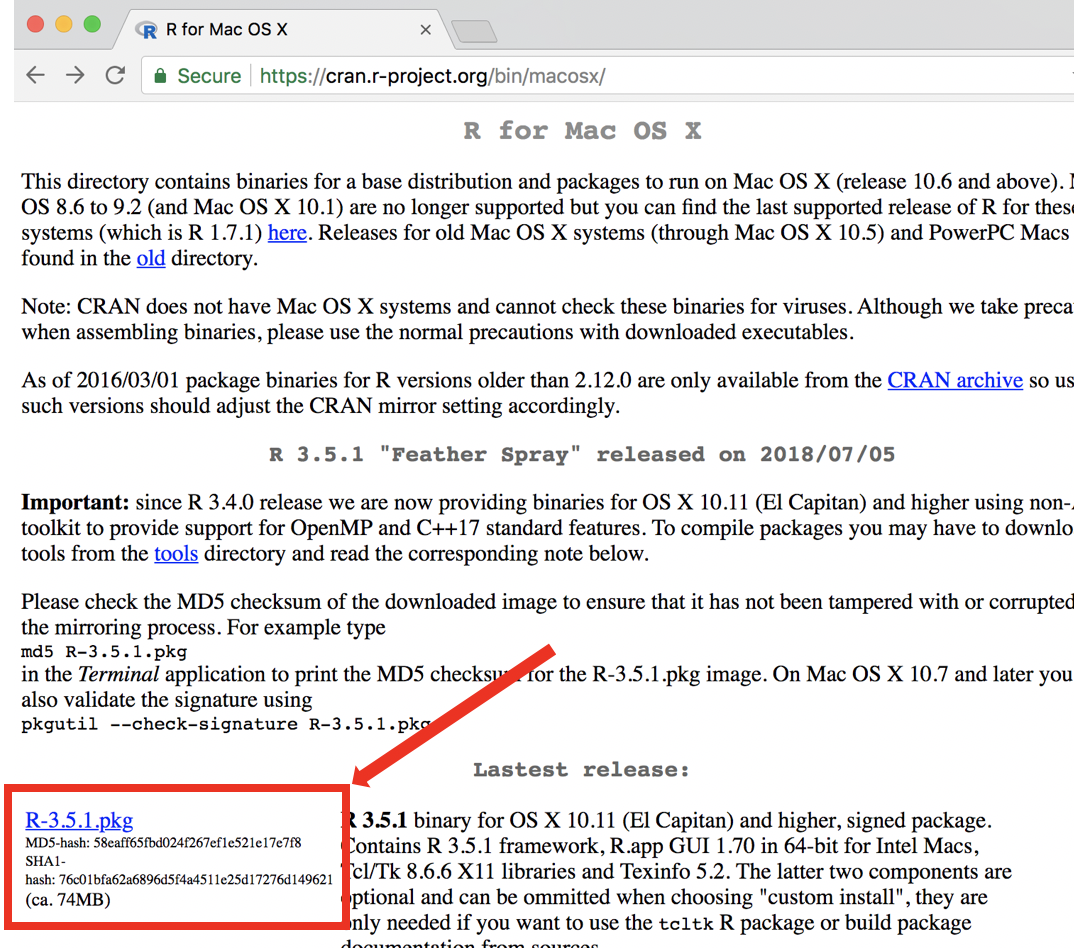 Are you running an old version of Mac OS X? The current versions of R require OS X 10.11 or higher. If you are using an older version of OS X, scroll down the page to see instructions to handle “Binaries for legacy OS X systems.” Follow the directions to install either R 3.3.3 (10.9 or higher) or R 3.2.1 (10.6-10.8). This will probably (but no guarantees) be sufficient for your needs at Kellogg. However, if you are running a version of OS X older than 10.11, you really should first update the OS.
2 Install RStudio
RStudio and R are not the same thing! RStudio provides convenient access to R through a graphical interface, as well as numerous other benefits. You need to install both R and RStudio, and we recommend installing R first.
RStudio installers for Windows, OS X, and Linux are at https://www.rstudio.com/. Download and run the installer for your operating system.
3 Install LaTeX
It is necessary to install LaTeX in order to create pdf files.
If you already have a version of LaTeX installed, you should skip the remainder of this section.1
If you do not have LaTeX installed, follow these instructions.
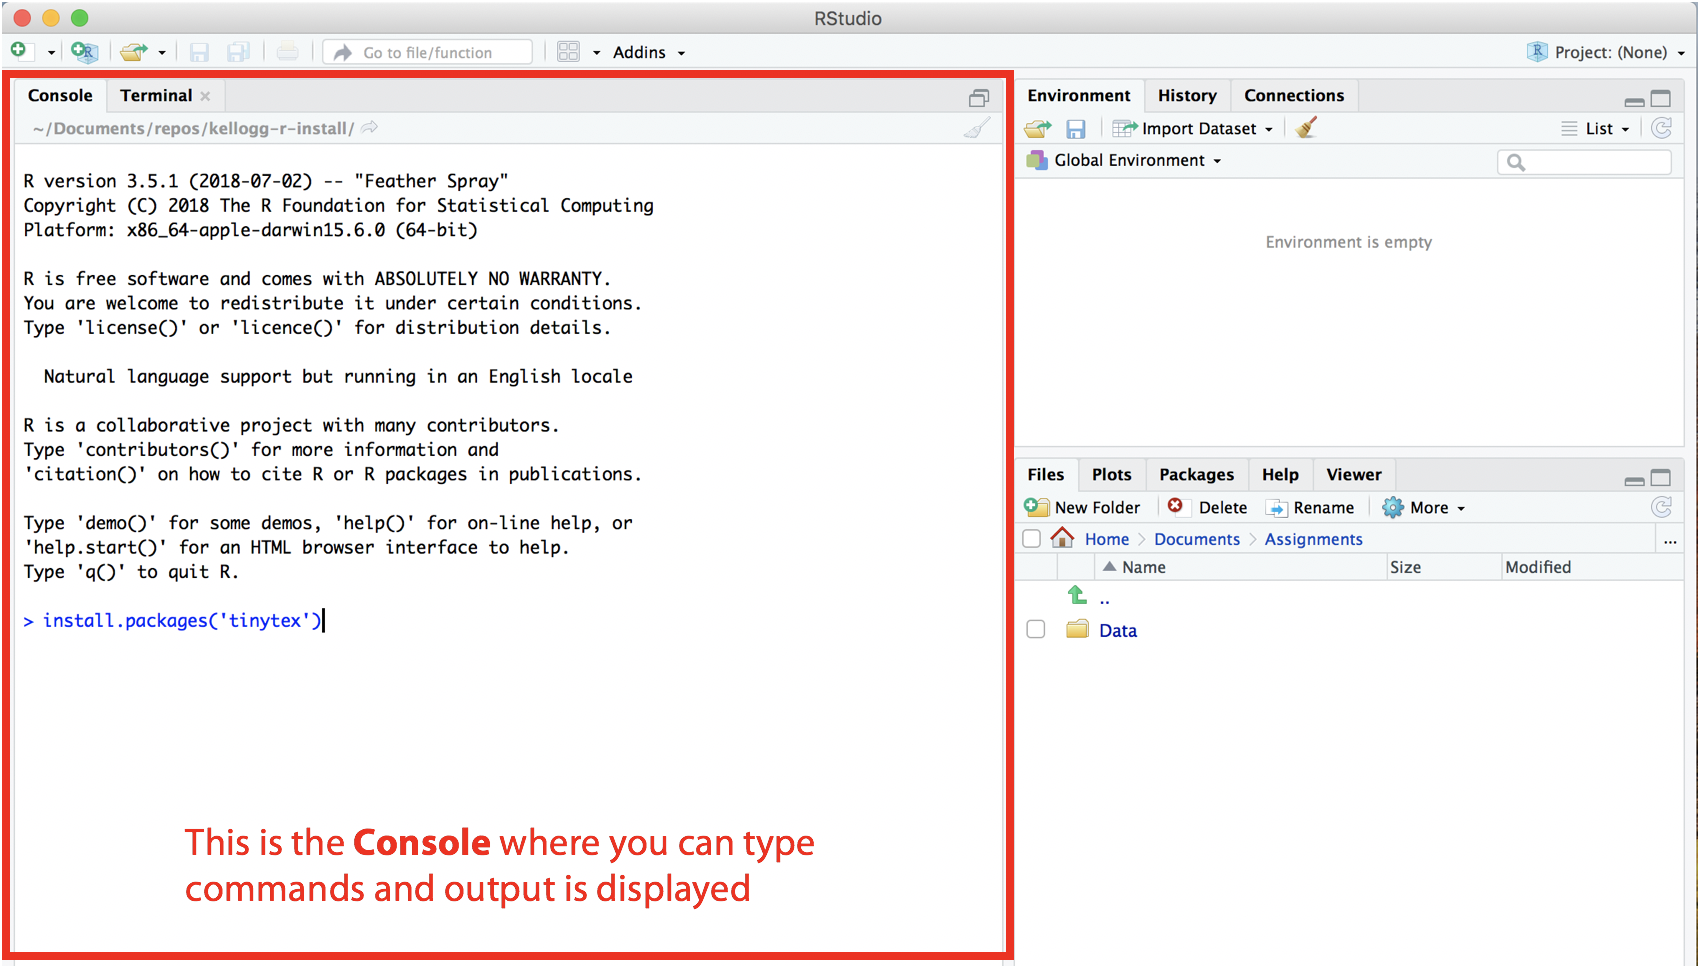
The console window in RStudio
Launch RStudio and place your cursor in the console window, as in the figure.
In the console, enter the appropriate commands for your operating system:
- Windows: Enter these two commands, pressing “Enter” after each.
install.packages('tinytex') tinytex::install_tinytex()- Mac OS X: Enter these two commands, pressing “Enter” after each:
install.packages('tinytex')
tinytex::install_tinytex(dir='~/.TinyTex') # That's a tilde, not a dash
Installation will take some time, perhaps 10 minutes. Some initial software (10 programs) will be downloaded and installed and then a number of LaTeX packages (78 packages).2 As the command executes, pay attention. Two error messages might pop up. You can click to dismiss them. When the installation completes, you will see a message like this in the console:
TinyTeX installed to C:\Users\Robert McDonald\AppData\Roaming/TinyTeX
Please restart your R session and IDE (if you are using one, such
as RStudio or Emacs) and check if tinytex:::is_tinytex() is TRUE.
You should follow the instructions. First, restart RStudio. Second, in the console run the command
tinytex:::is_tinytex(). It should respondTRUE.If you successfully installed
tinytex, you can continue to the next section.
4 Create a new RStudio Project
An RStudio project helps you manage all the code and data associated with a particular task. You can create projects to organize your work in different ways. We recommend creating one RStudio project for each assignment in each course as this will give you the most flexibility. When you create a project, RStudio simply creates a file with a “.Rproj” suffix in whatever location you deem to be the project folder.
To create a new project in RStudio:
- From the File menu, select New Project.
- Click New Directory.
- Click New Project.
- Type the name of the new folder in which you want to store all course assignments and data. RStudio will automatically create this folder for you. For example, you might call this folder retail-analytics-assignments.
- Specify the folder in which RStudio should create this project folder.
- Click on Create Project.
RStudio will create the project and open it. Information about the project is stored in the project directory in a new file called retail-analytics-assignments.Rproj. The easiest way to open the project in the future is to double click on this .Rproj file. In the steps above, you can alternatively choose to place the new project in an existing folder, rather than creating a new one for the project.
You should store files for each course within this project directory. When you work on these files, you should first open the project in RStudio.
5 Run the Tutorial
You will run your first R program to make sure everything is set up properly and to automatically install some additional packages. Make sure you are connected to the Internet when you complete this step.
- Download two files from Canvas and store them in the course project directory:
- dominicks.Rmd - This file is an R Markdown document. When saving the file, make sure it has a .Rmd extension.
- dominicks_oj.xlsx - Input data for dominicks.Rmd.
Open the course project in RStudio. There are two ways to do this.
- Open RStudio. Using the menu, select File|Open Project and navigate to the project directory to select the .Rproj file.
- Double click on the .Rproj file, which should open RStudio and the project.
Once you open the project, your RStudio window should look like this:
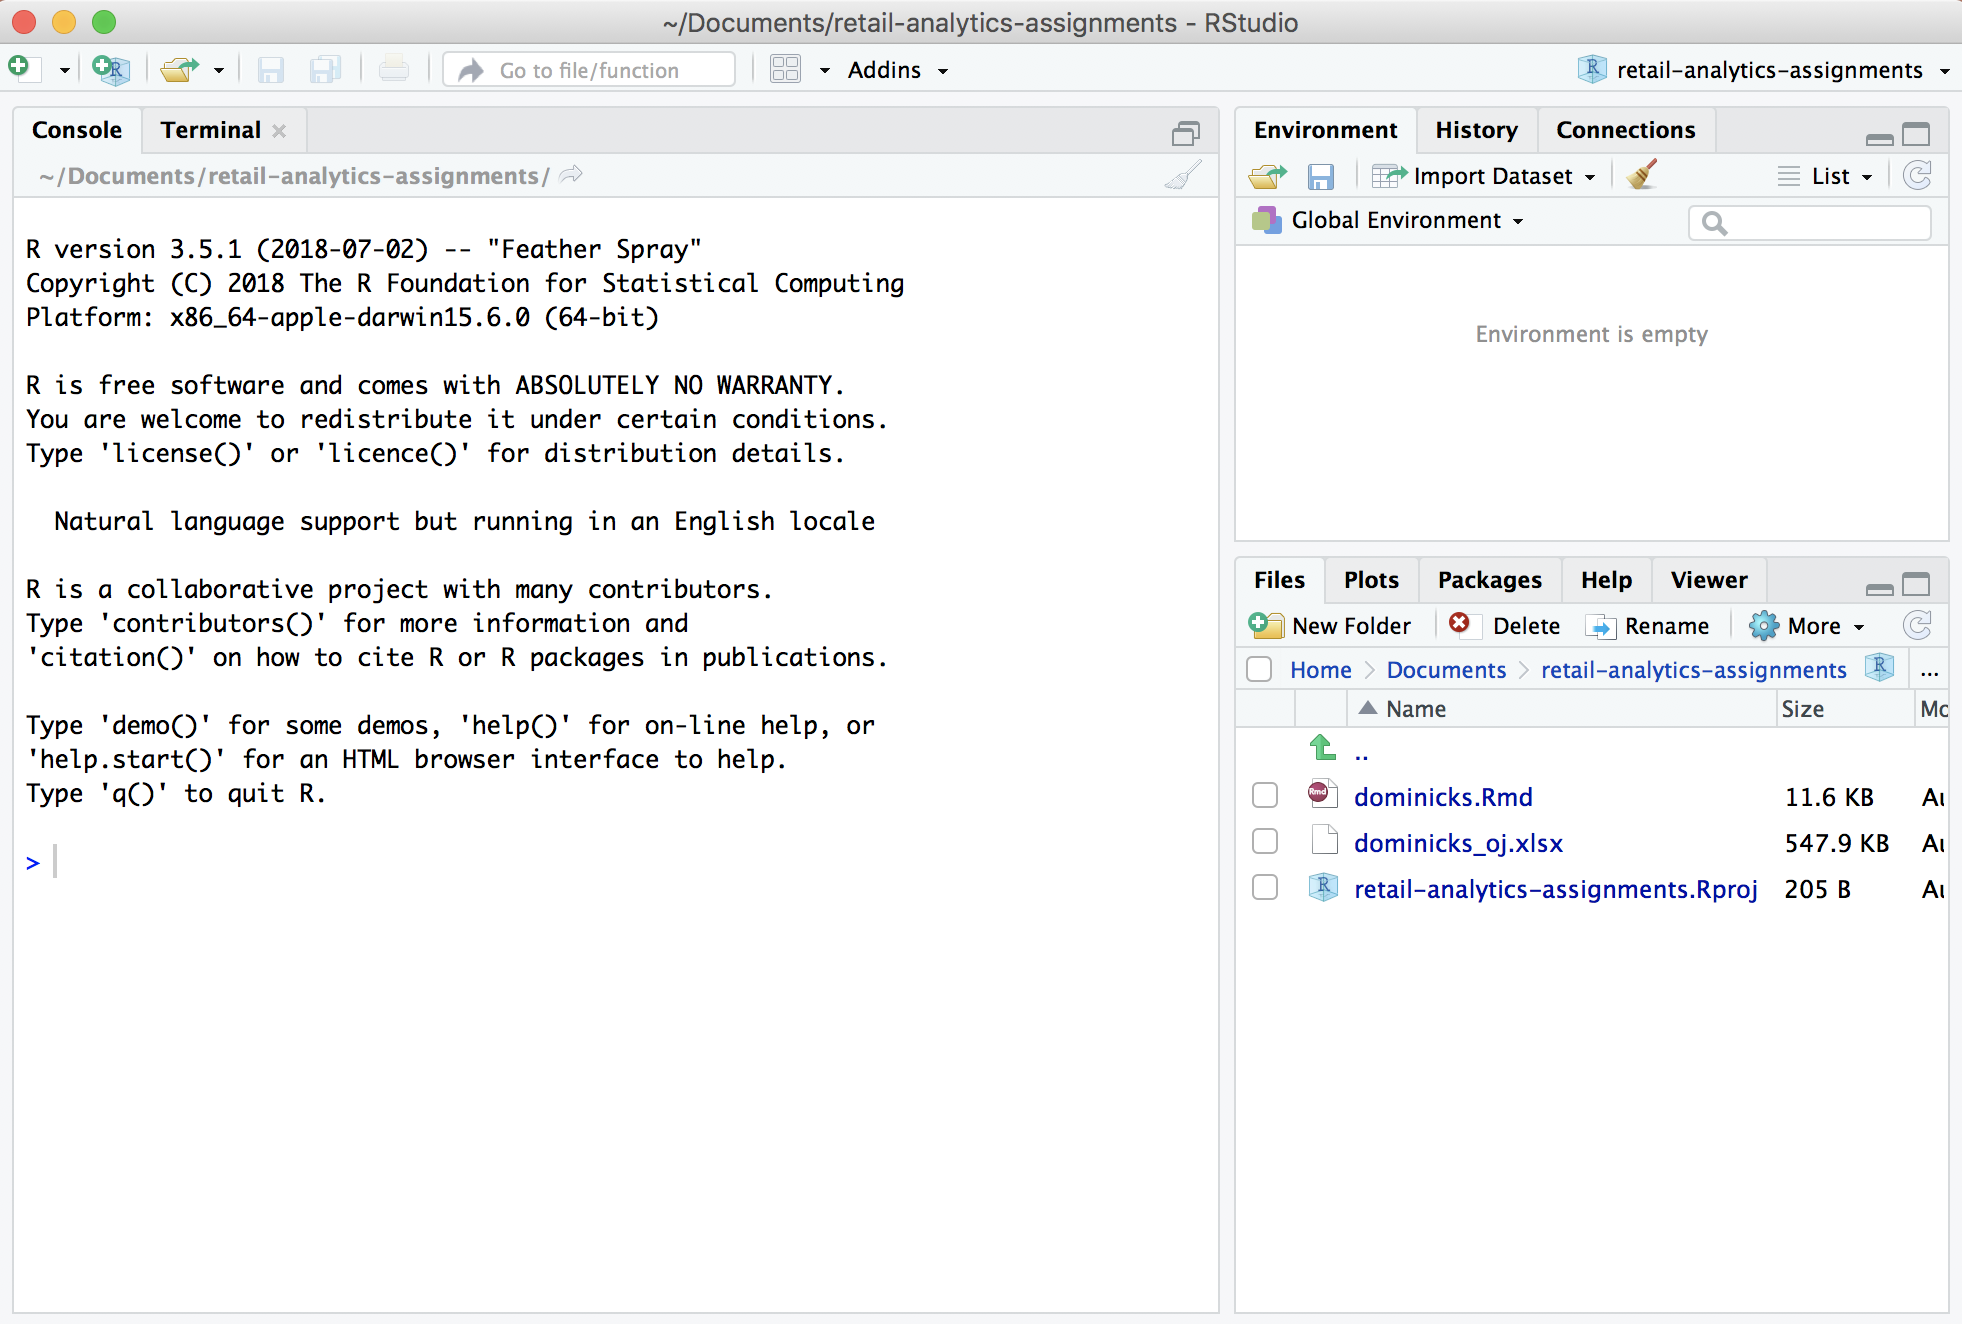
In the Files window on the lower right, click on the dominicks.Rmd file. Alternatively, you can open this file using File|Open File. Note the Files pane shows us that both dominicks.Rmd and dominicks_oj.xlsx are in project folder.
When you open dominicks.Rmd, you might see an RStudio window pop-up asking to “Install Required Packages”. If so, click on Yes.
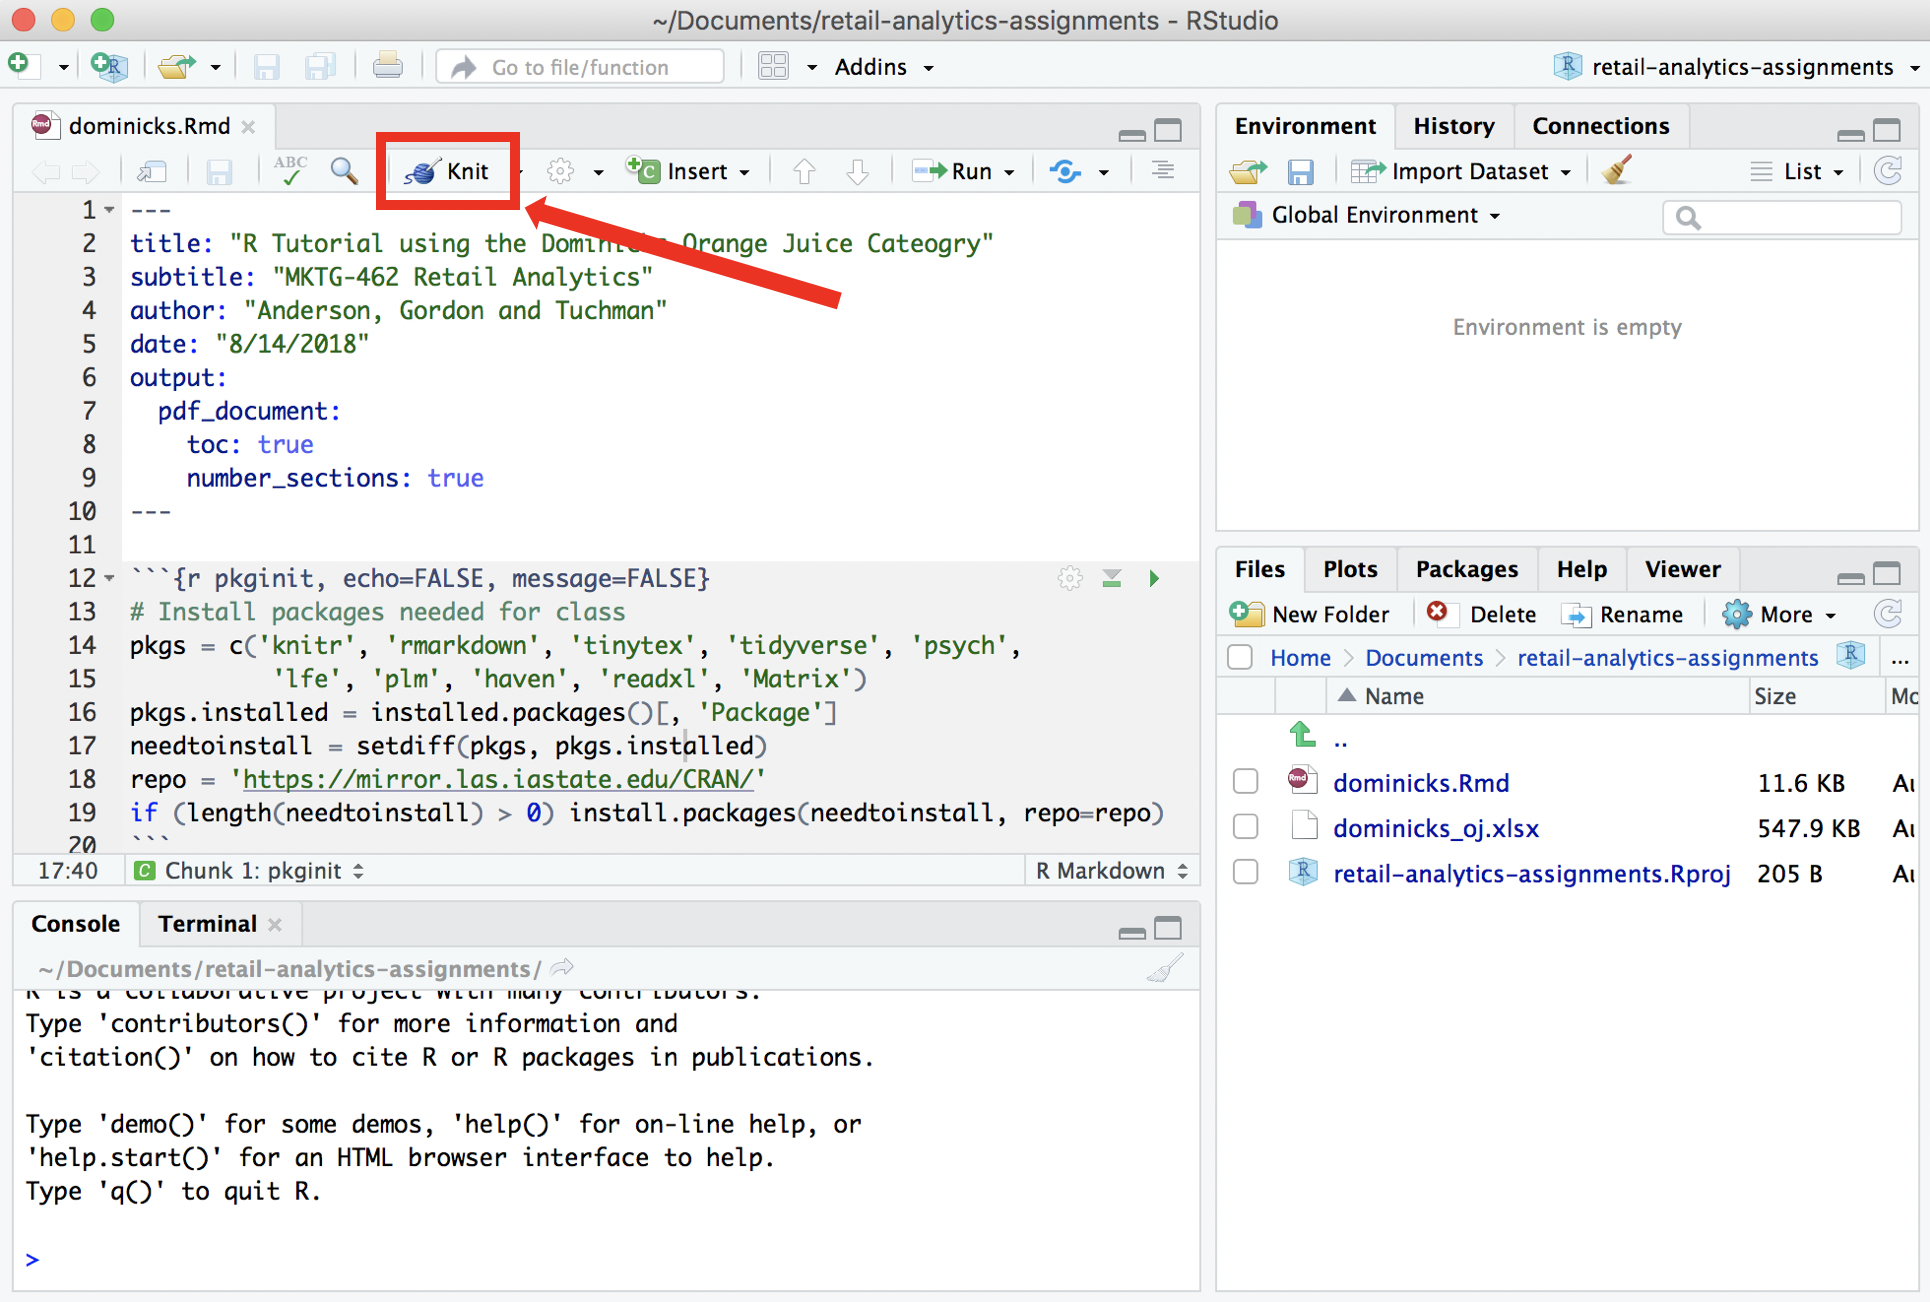
Click the “knit” button, as shown in the image below. RStudio may again ask your permission to install necessary packages, and if so, allow it to do so. When it finishes installing packages, it should automatically resume compiling the document. If you click “knit” a second time, the document will be reprocessed and you will obtain a version that does not contain messages about package installations.
- After a few moments, you will see output generated in the R Markdown window in the lower left of RStudio. This means RStudio is compiling the document. You may also notice some temporary files being created and removed in the project folder. When it is finished, the message “\(\color{red}{\text{Output created: dominicks.pdf}}\)” should be displayed at the bottom of the R Markdown window, and there should be a new file, dominicks.pdf, in the project directory. This file is a standard PDF document that you can open with any PDF viewer, move to a different directory, send to a friend, etc. After the PDF is created, a window will automatically open to display it.
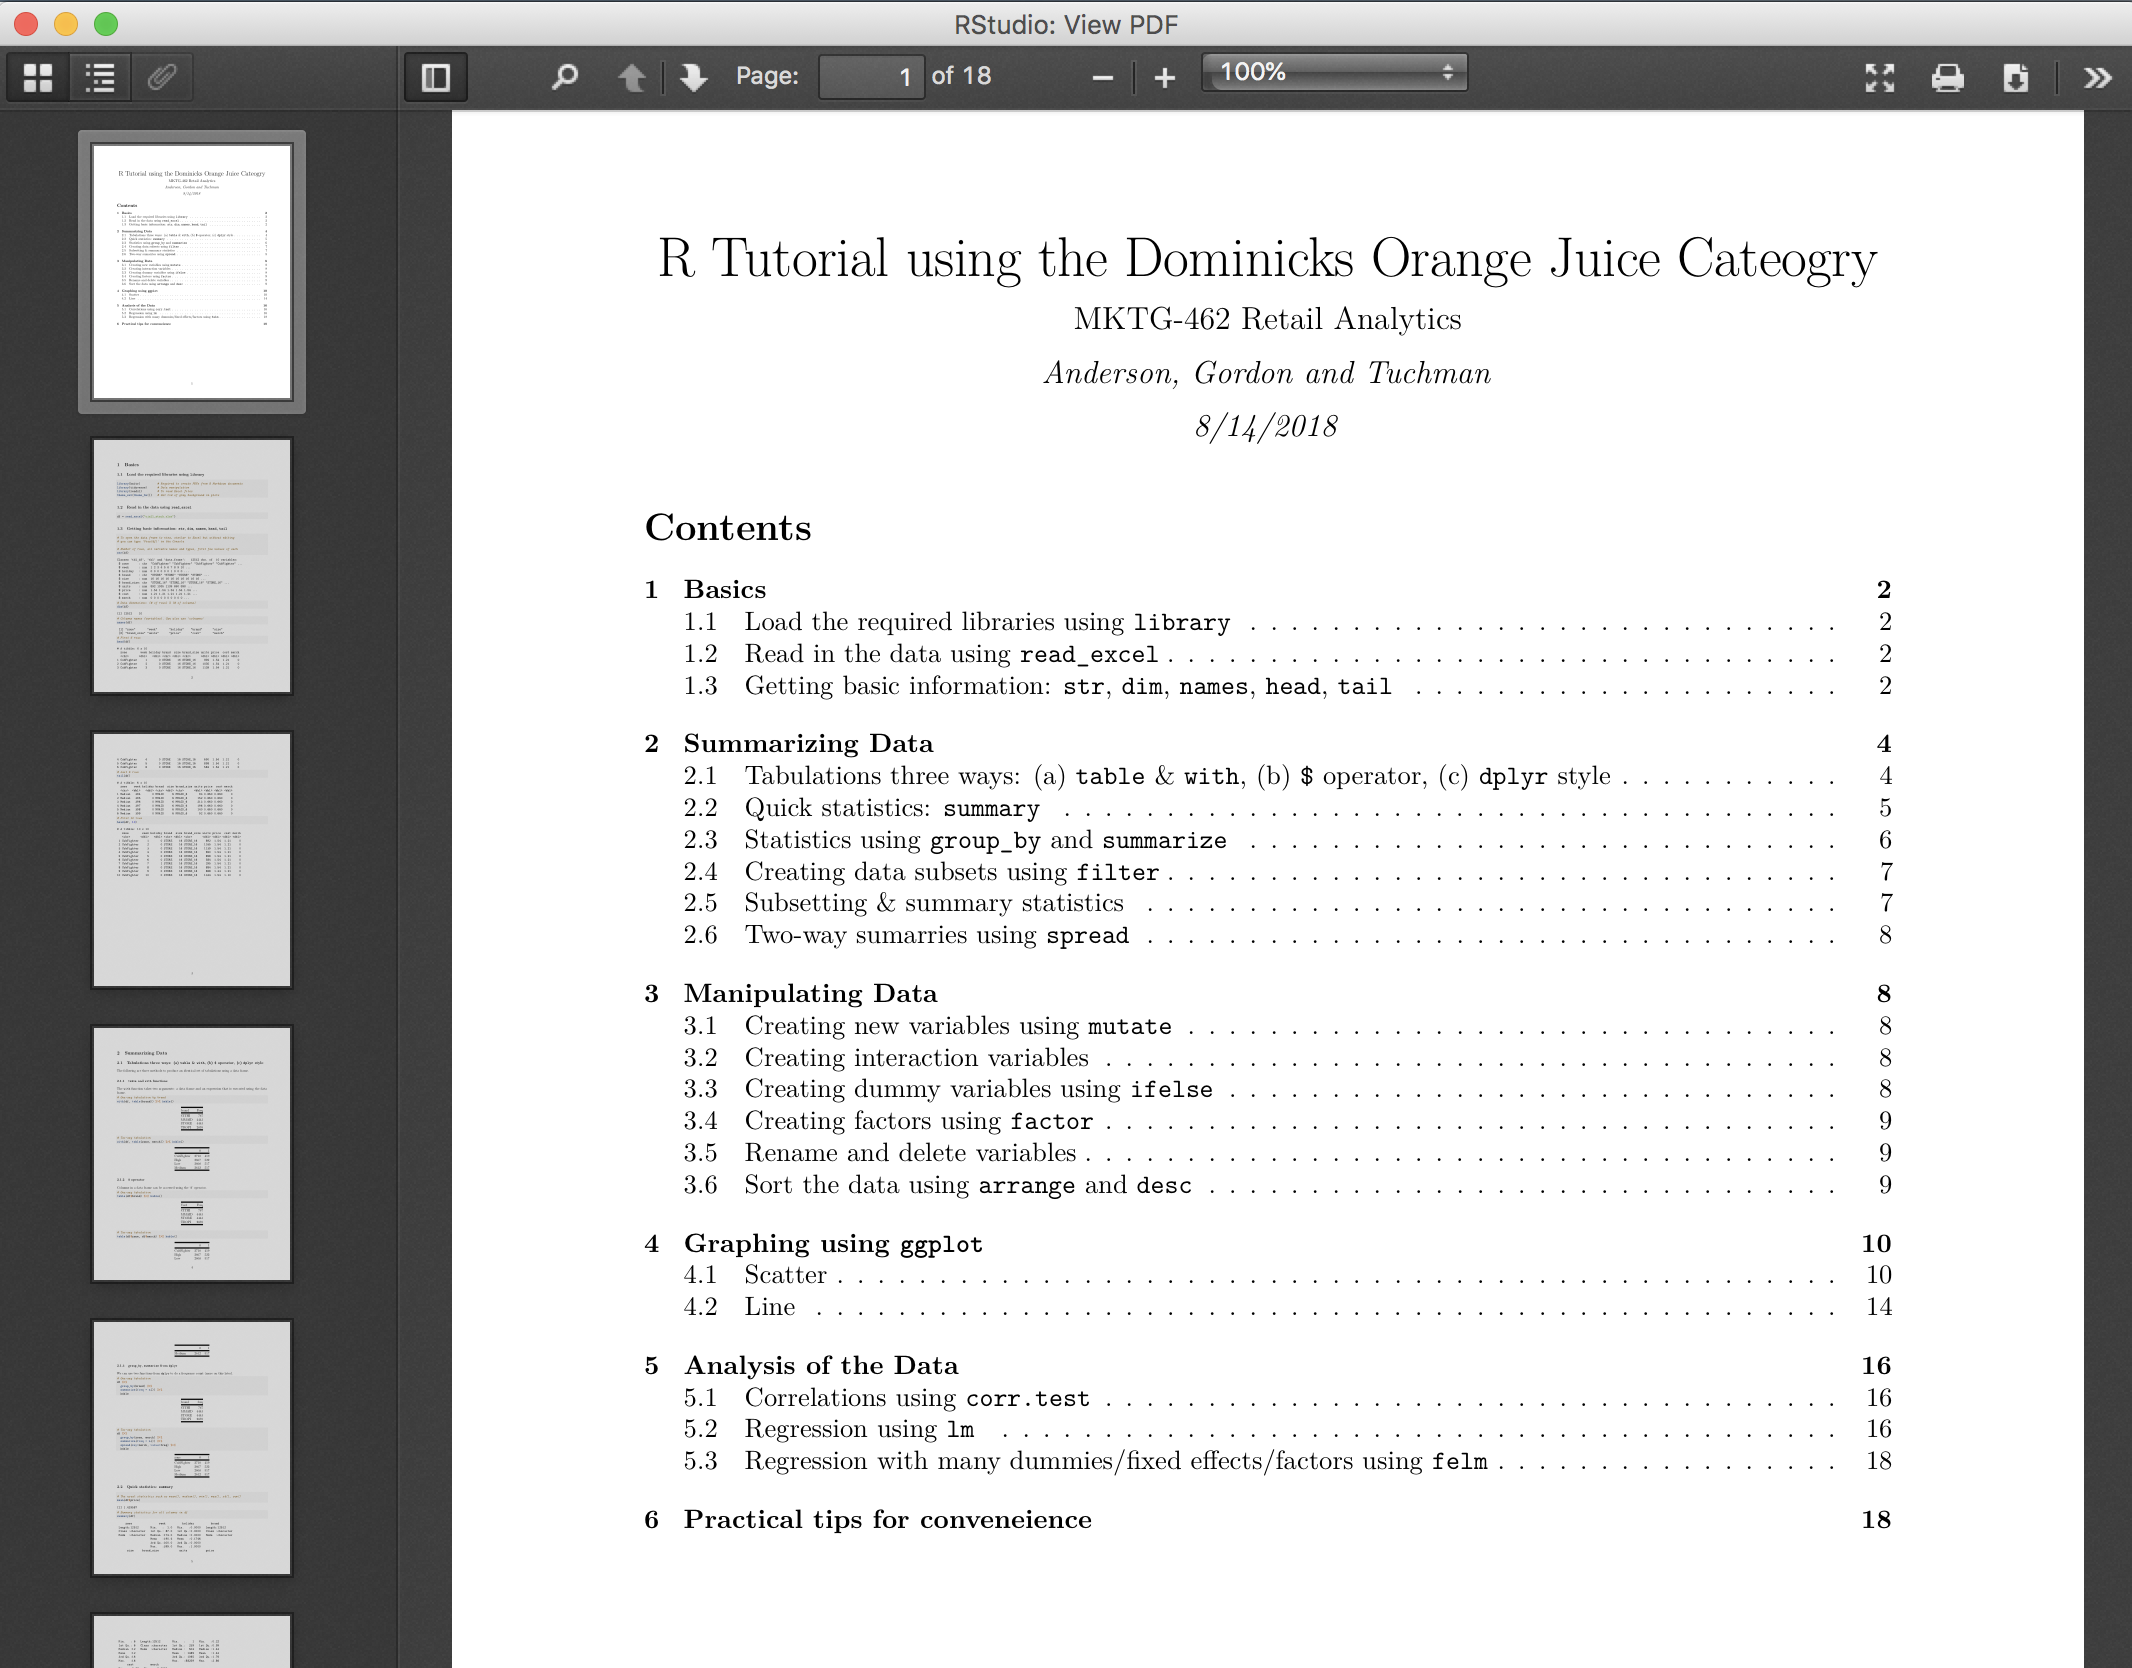
- The PDF is a tutorial on using R to analyze data on orange juice sales at Dominicks Fine Foods (a now defunct grocery store in Chicago). Scroll to the end of the document and you should see a message titled “Package Installation Report,” listing the packages that were installed or that none were required.
If dominicks.pdf is created and the first page looks similar, that’s it! You have compiled your first R Markdown document and all the packages are working properly. This includes the installation of the tidyverse collection of packages, which handle data manipulation, plotting, and more. You also installed a small version of , which is a suite of programs that collectively produce PDF documents. You will never have to run any of these programs yourself. Rather, RStudio uses , behind the scenes, as needed, to create PDF documents from R Markdown documents.
If you are not connected to the Internet, you will see a message at the bottom of the first page of the PDF such as “Warning: unable to access index for repository…” Make sure you are connected and then click on the “knit” button again.
Copyright © 2018 Brett Gordon and Robert McDonald. All rights reserved.